ISO 14731 defines “Welding is a special process, which requires the coordination of welding operations to establish confidence in welding fabrication and reliable performance in service. The tasks and responsibilities of personnel involved in welding-related activities (e. g. planning, executing, supervising, and inspection) should be clearly defined.”
The standard defines further: Where welding coordination is carried out by more than one person, the tasks and responsibilities shall be allocated, such that responsibility is clearly defined and the persons are qualified for each specific welding coordination task.
Welding coordination is the sole responsibility of the manufacturer.
The manufacturer shall appoint at least one responsible welding coordinator.
Welding coordination may be subcontracted. However, compliance to this International Standard remains the responsibility of the manufacturer.
For all tasks assigned, welding coordinators shall be able to demonstrate adequate technical knowledge to ensure satisfactory performance of these tasks.
Personnel with comprehensive technical knowledge “Level A”
Full technical knowledge is required for the planning, executing, supervising and testing of all tasks and responsibilities in welding fabricationPersonnel with specific technical knowledge “Level B”
The level of technical knowledge needs to be sufficient for the planning, executing, supervising and testing of the tasks and responsibilities in welding fabrication within a selective or limited technical fieldPersonnel with basic technical knowledge “Level C”
The level of technical knowledge needs to be sufficient for the planning, executing, supervising and testing of the tasks and responsibilities within a limited technical field, involving only simple welded constructions.

FAQs
View Answers to Frequently Asked Questions
What is a welding coordinator according to EN 15085-2?
What is Phased Array UT?
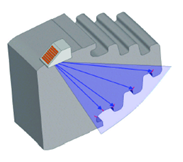
Phased Array Ultrasonic Testing (PA UT) uses a single transducer containing multiple elements (16 to 128) to send angle beams of sound through the test object. Each element can be individually pulsed to send out timed sound waves, in phases. This creates several beam angles, which combine to make an array. This array identifies changes in the material, such as cracks or inclusions, and shows these indications on the screen.
Please provide information about Dye Penetrant Inspection (DPI) – Liquid Penetrant Inspection (LPI) – Liquid Penetrant Testing (PT)
Dye Penetrant Inspection (DPI), also called Liquid Penetrant Inspection (LPI) or Liquid Penetrant Testing (PT), is a widely applied and low-cost inspection method used to locate surface-breaking defects in all non-porous materials (metals, plastics, or ceramics). For applications where a greater sensitivity to smaller defects is required, the fluorescent penetrant method is preferred.
The Penetrant may be applied to all non-ferrous materials and ferrous materials, but for inspection of ferrous components magnetic-particle inspection may be preferred for its subsurface detection capability.
Commonly, DPI is used to detect cracks, surface porosity, lack of penetration in welds and defects resulting from in-service conditions (e.g. fatigue cracks of components or welds) in castings, forgings, and welding surface defects.
The effectiveness of this method relies on many factors including the training/skill of the technician, how clean the part is, and the procedure that is being used to perform the test. DPI is a relatively cost-effective method, considering the amount of training required, and the cost of materials used. DPI can be used in both manufacturing and in-service inspections. As with other inspection methods, DPI requires that a known defect standard has been defined using standard parameters. Thus indications can be compared to defined allowable limits.
The basic steps are:
- Clean the part
- Apply the Penetrant and allow dwelling
- Remove excess Penetrant.
- Apply a developer and allow developing
- Read the part for indications. 6) Clean the part.
This may sound easy, BUT, here comes the tricky part. There are several variations to every step – i.e. what type of Penetrant? What method (of excess Penetrant removal) of Penetrant? What sensitivity of Penetrant? What form of a developer? What class of solvent (to remove excess Penetrant)?
What is the difference between an AWS PQR and an ISO WPQR?
The quick answer is this. An AWS PQR (Procedure Qualification Record) does not include ranges of approval. These are issued to the WPS (Welding Procedure Specification). An ISO WPQR (Welding Procedure Qualification Record) includes the range of approval. An ISO WPS shall not include ranges outside the defined scope of the ISO WPQR. Lately, The abbreviation PQR is also recognized when approving a process according to ISO standards.
Most, if not all, codes and specifications require approval by the responsible engineer, welding engineer, expert, supervisor, or welding coordinator (definition depending on the applicable code/specification). The assigned expert shall have the knowledge to determine if a possible range of approval is truly the range that leads to the desired/required acceptable weld.
What exactly is a Bubble Leak Test?
It is used for applications that do not require high sensitivity. With bubble testing, the part under test is pressurized, submerged in a liquid—typically water—while the operator looks for bubbles. Bubbles form at the source of the leak as a result of air pressure, and the number of bubbles per minute can signify the size of the leak.
If a more sensitive test is required, the “Pressure Change/Decay Method” can be applied. The pressure decay testing method measures the decrease in pressure in an object. A test object is initially inflated and then a reference pressure is established. After a designated amount of time, the pressure is monitored again, and the initial and final measurements are compared. The change in pressure can be used to calculate the leak rate given the internal volume of the device. Pressure decay is able to detect minute changes in pressure. A pressure drop signifies a leak; the greater the pressure drop, the larger the leak. This method is convenient in that it is easily automated and dry.


